Category Archives: Forking Recipes

Interesting twists on everyday things as well as the unusual

Bavarian Inspired Potato Dumplings Recipe


Bavarian Inspired Potato Dumplings

This recipe is based on German Food Expert Jennifer McGavino’s Recipe for Bavarian Potato Dumplings. Bavarian Potato Dumplings are a Sunday Comfort Food. You can eat them with melted butter and toasted bread crumbs. You can simply pour cold milk on the hot dumplings and eat them that way or serve them with a gravy. There are many variations of Bavarian Potato Dumplings. Kartoffel Kioesse, Rotte Kloesse and Baumnollene Kloesse. Some involve using a combination of raw mushed red potatoes that are drained threw linen cloth and are mixed with cooked potatoes. They take lots of practice before you will be successful because they are even difficult for experts to prepare. Besides incredible fluffy breakfast eggs and BBQ, the only food my father used to prepare when I was a child were similar Bavarian Dumplings….he said his mother made them for him. I took a few liberties to make the dumplings more delicious by infusing the potatoes with flavors and I skipped the extra buttered bread crumbs the original recipe called for because I never had these dumplings that way and for my taste they weren’t needed but feel free to butter up a 1/2 cup of bread crumbs if you desire. The other change I did was that I substituted polenta for farina of the original recipe but not to make a change but due to what I had in my pantry. The dumplings still came out with the same taste…..My husband never had Bavarian Dumplings before and said they came out very delicious. Try them and see what you think!

Bavarian Inspired Potato Dumplings

Ingredients for about 6 servings

5 or more average size russet potatoes – peeled – cooked till tender and chilled (you will need 3 1/2 cups riced)

1 hot pepper – to boil with potatoes for flavor (I used a banana pepper)

1 garlic clove – to boil with potatoes for flavor

1/2 sweet onion – to boil with potatoes for flavor

1 Tablespoon kosher salt or sea salt – to boil with potatoes

2 slices quality white bread – cut in small cubes.

2 Tablespoons unsalted butter

1/2 cup flour

1/2 cup polenta (not instant)

1 1/2 teaspoon sea salt

3 1/2 cups of riced potatoes

2 eggs beaten

a few grates fresh nutmeg

a pinch white pepper

Directions

In a fry pan heat up the butter on medium high heat and add the bread cubes and let go till golden brown.

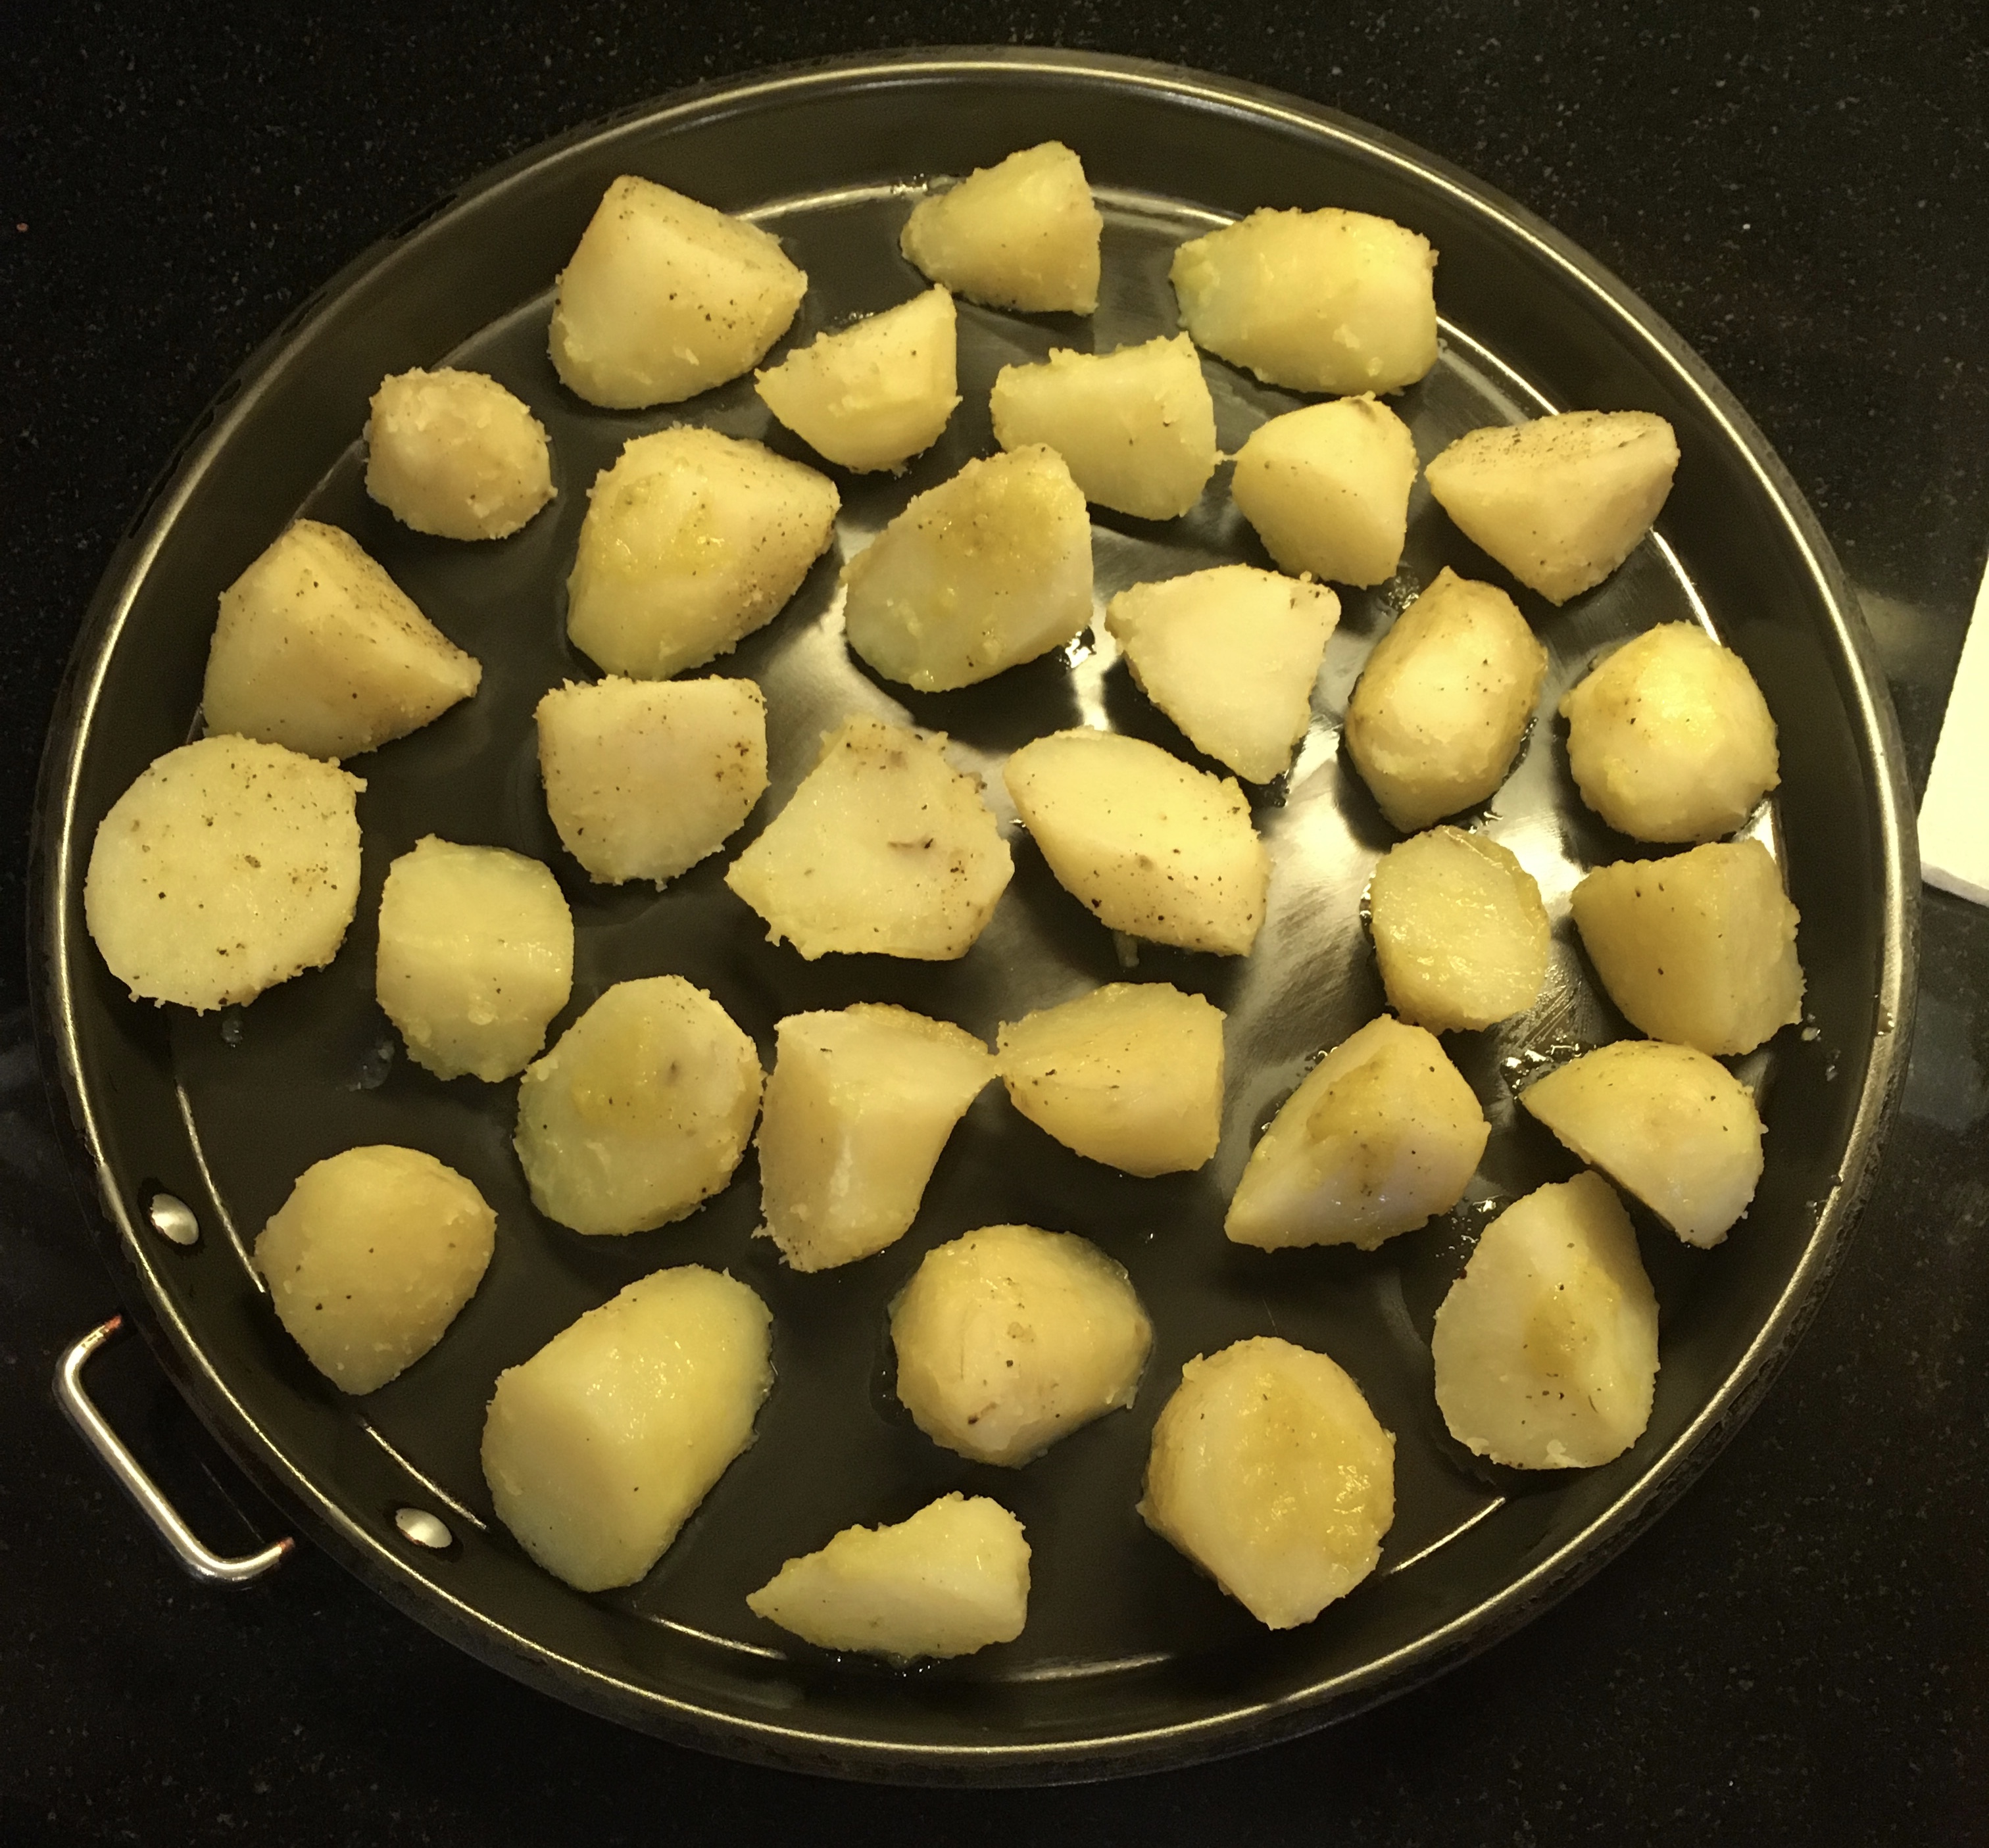
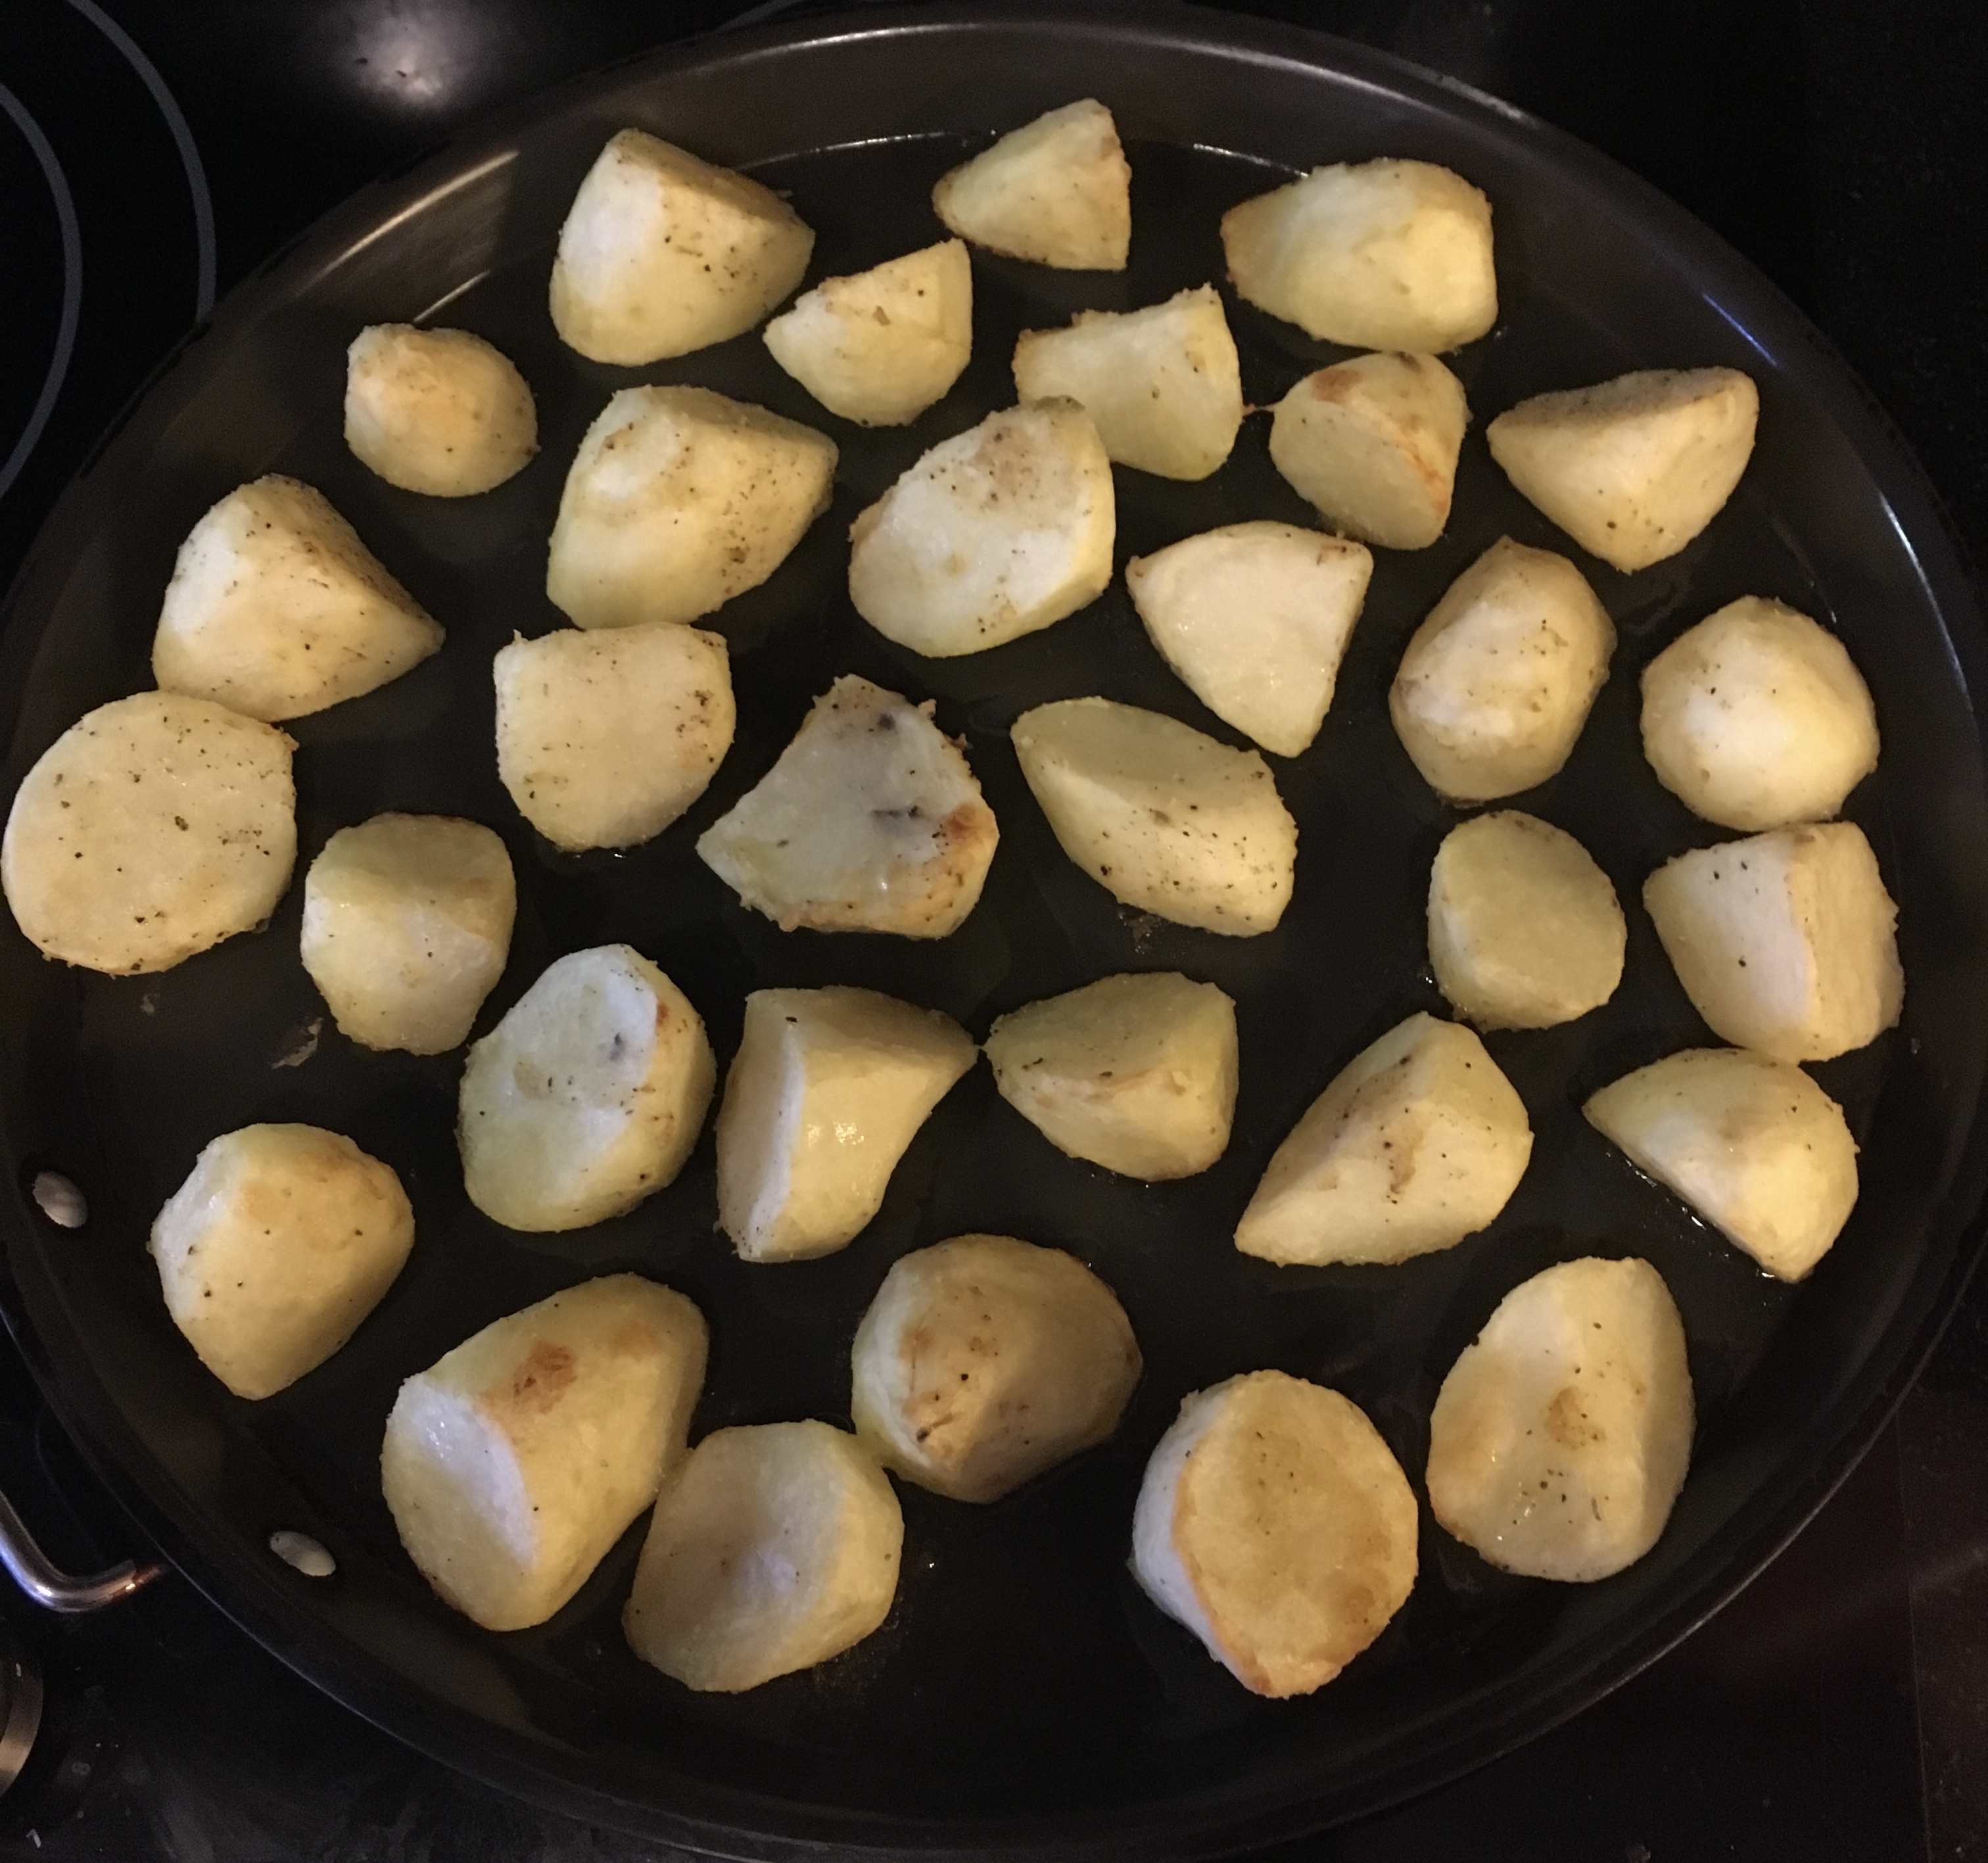
If you didn’t boil your peeled potatoes yet do so now with the hot pepper, onion garlic and 1 Tablespoon kosher or sea salt. Boil potatoes till fork tender, SCOOP the potatoes out with a slotted spoon and toss out the pepper, onion and garlic in the trash. BUT SAVE THE WATER!!!!!!!! You will use the flavored water to boil the dumplings in……The potatoes must be chilled for this recipe to work out so make sure your potatoes are good and chilled. Once chilled…

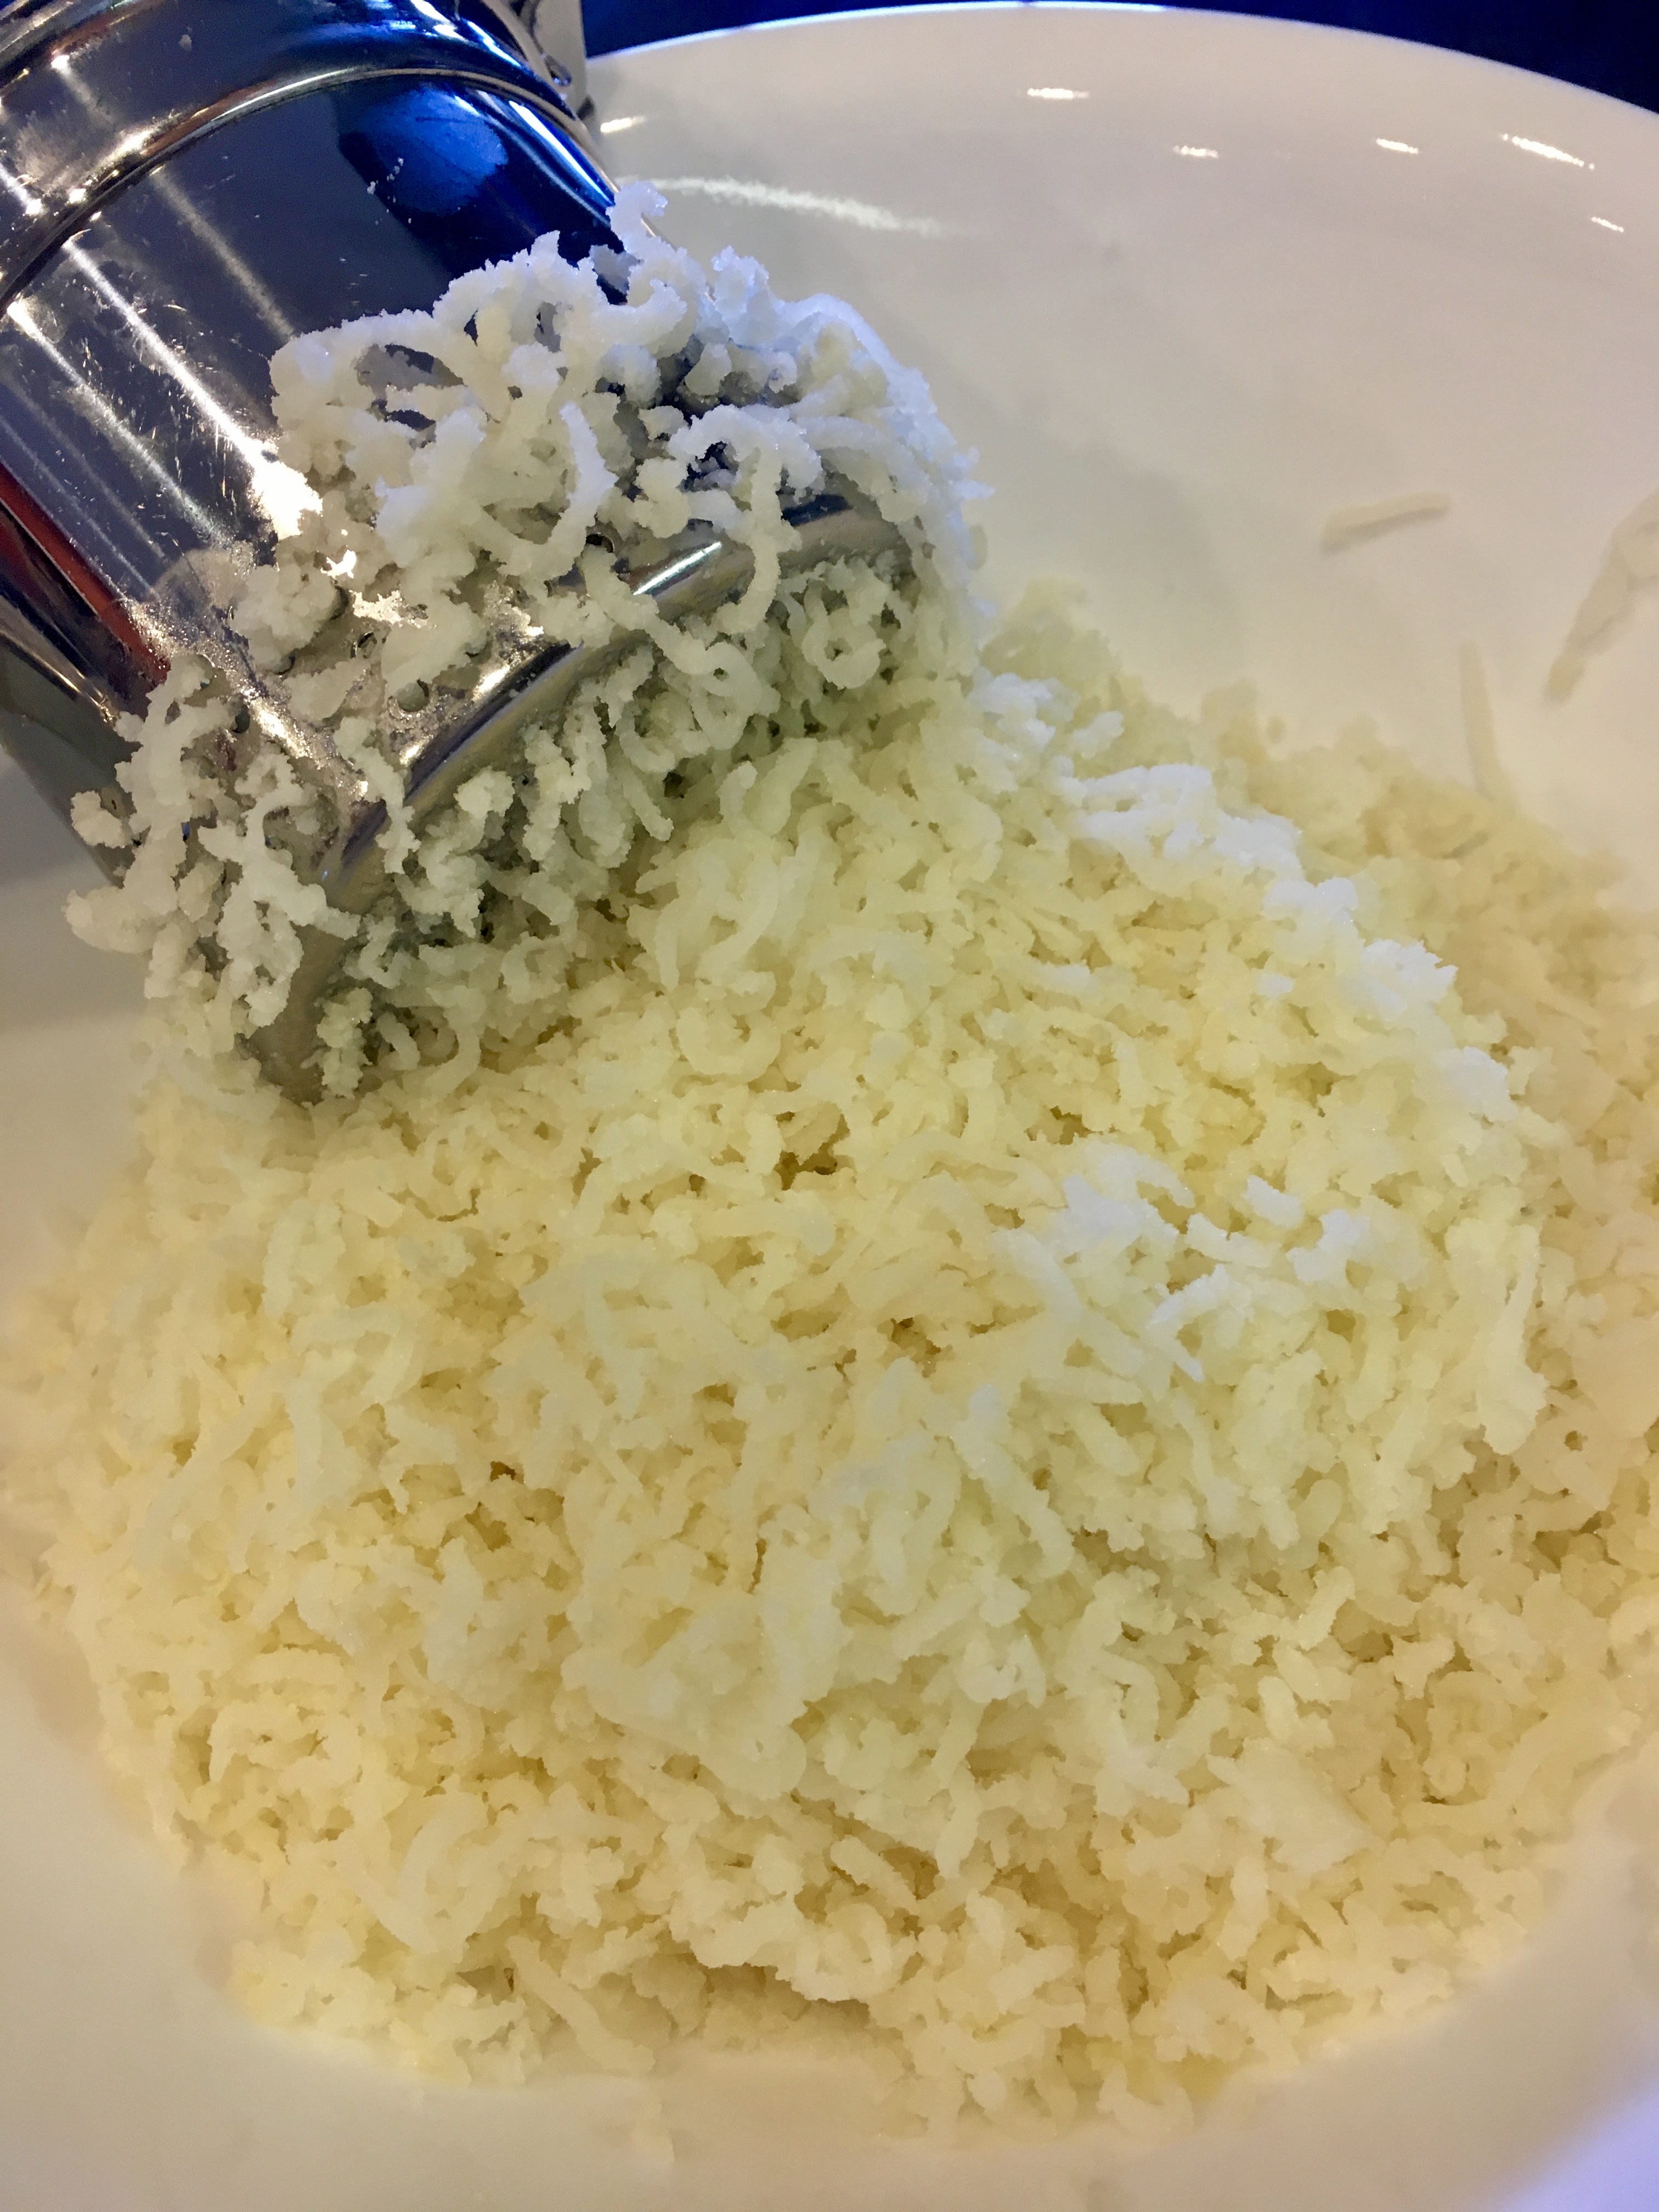
In a large bowl rice the potatoes.

In a small bowl combine flour, polenta, 1 1/2 teaspoon sea salt, nutmeg and pepper and eggs. The small bowl mixture will be very thick.

Mix well and combine with potatoes.

Now get a pot on to boil with the flavored water you saved and add enough to boil dumplings.

Once pot boils turn it down to just over a simmer.

I did one smaller dumpling as a test..I rolled it into a big marble and stuffed a small crouton in it then it went into the pot..to check to see if I had enough flour in it and also checked for seasoning. I let the smaller dumpling cook for about ten minutes. I thought it came out perfect.

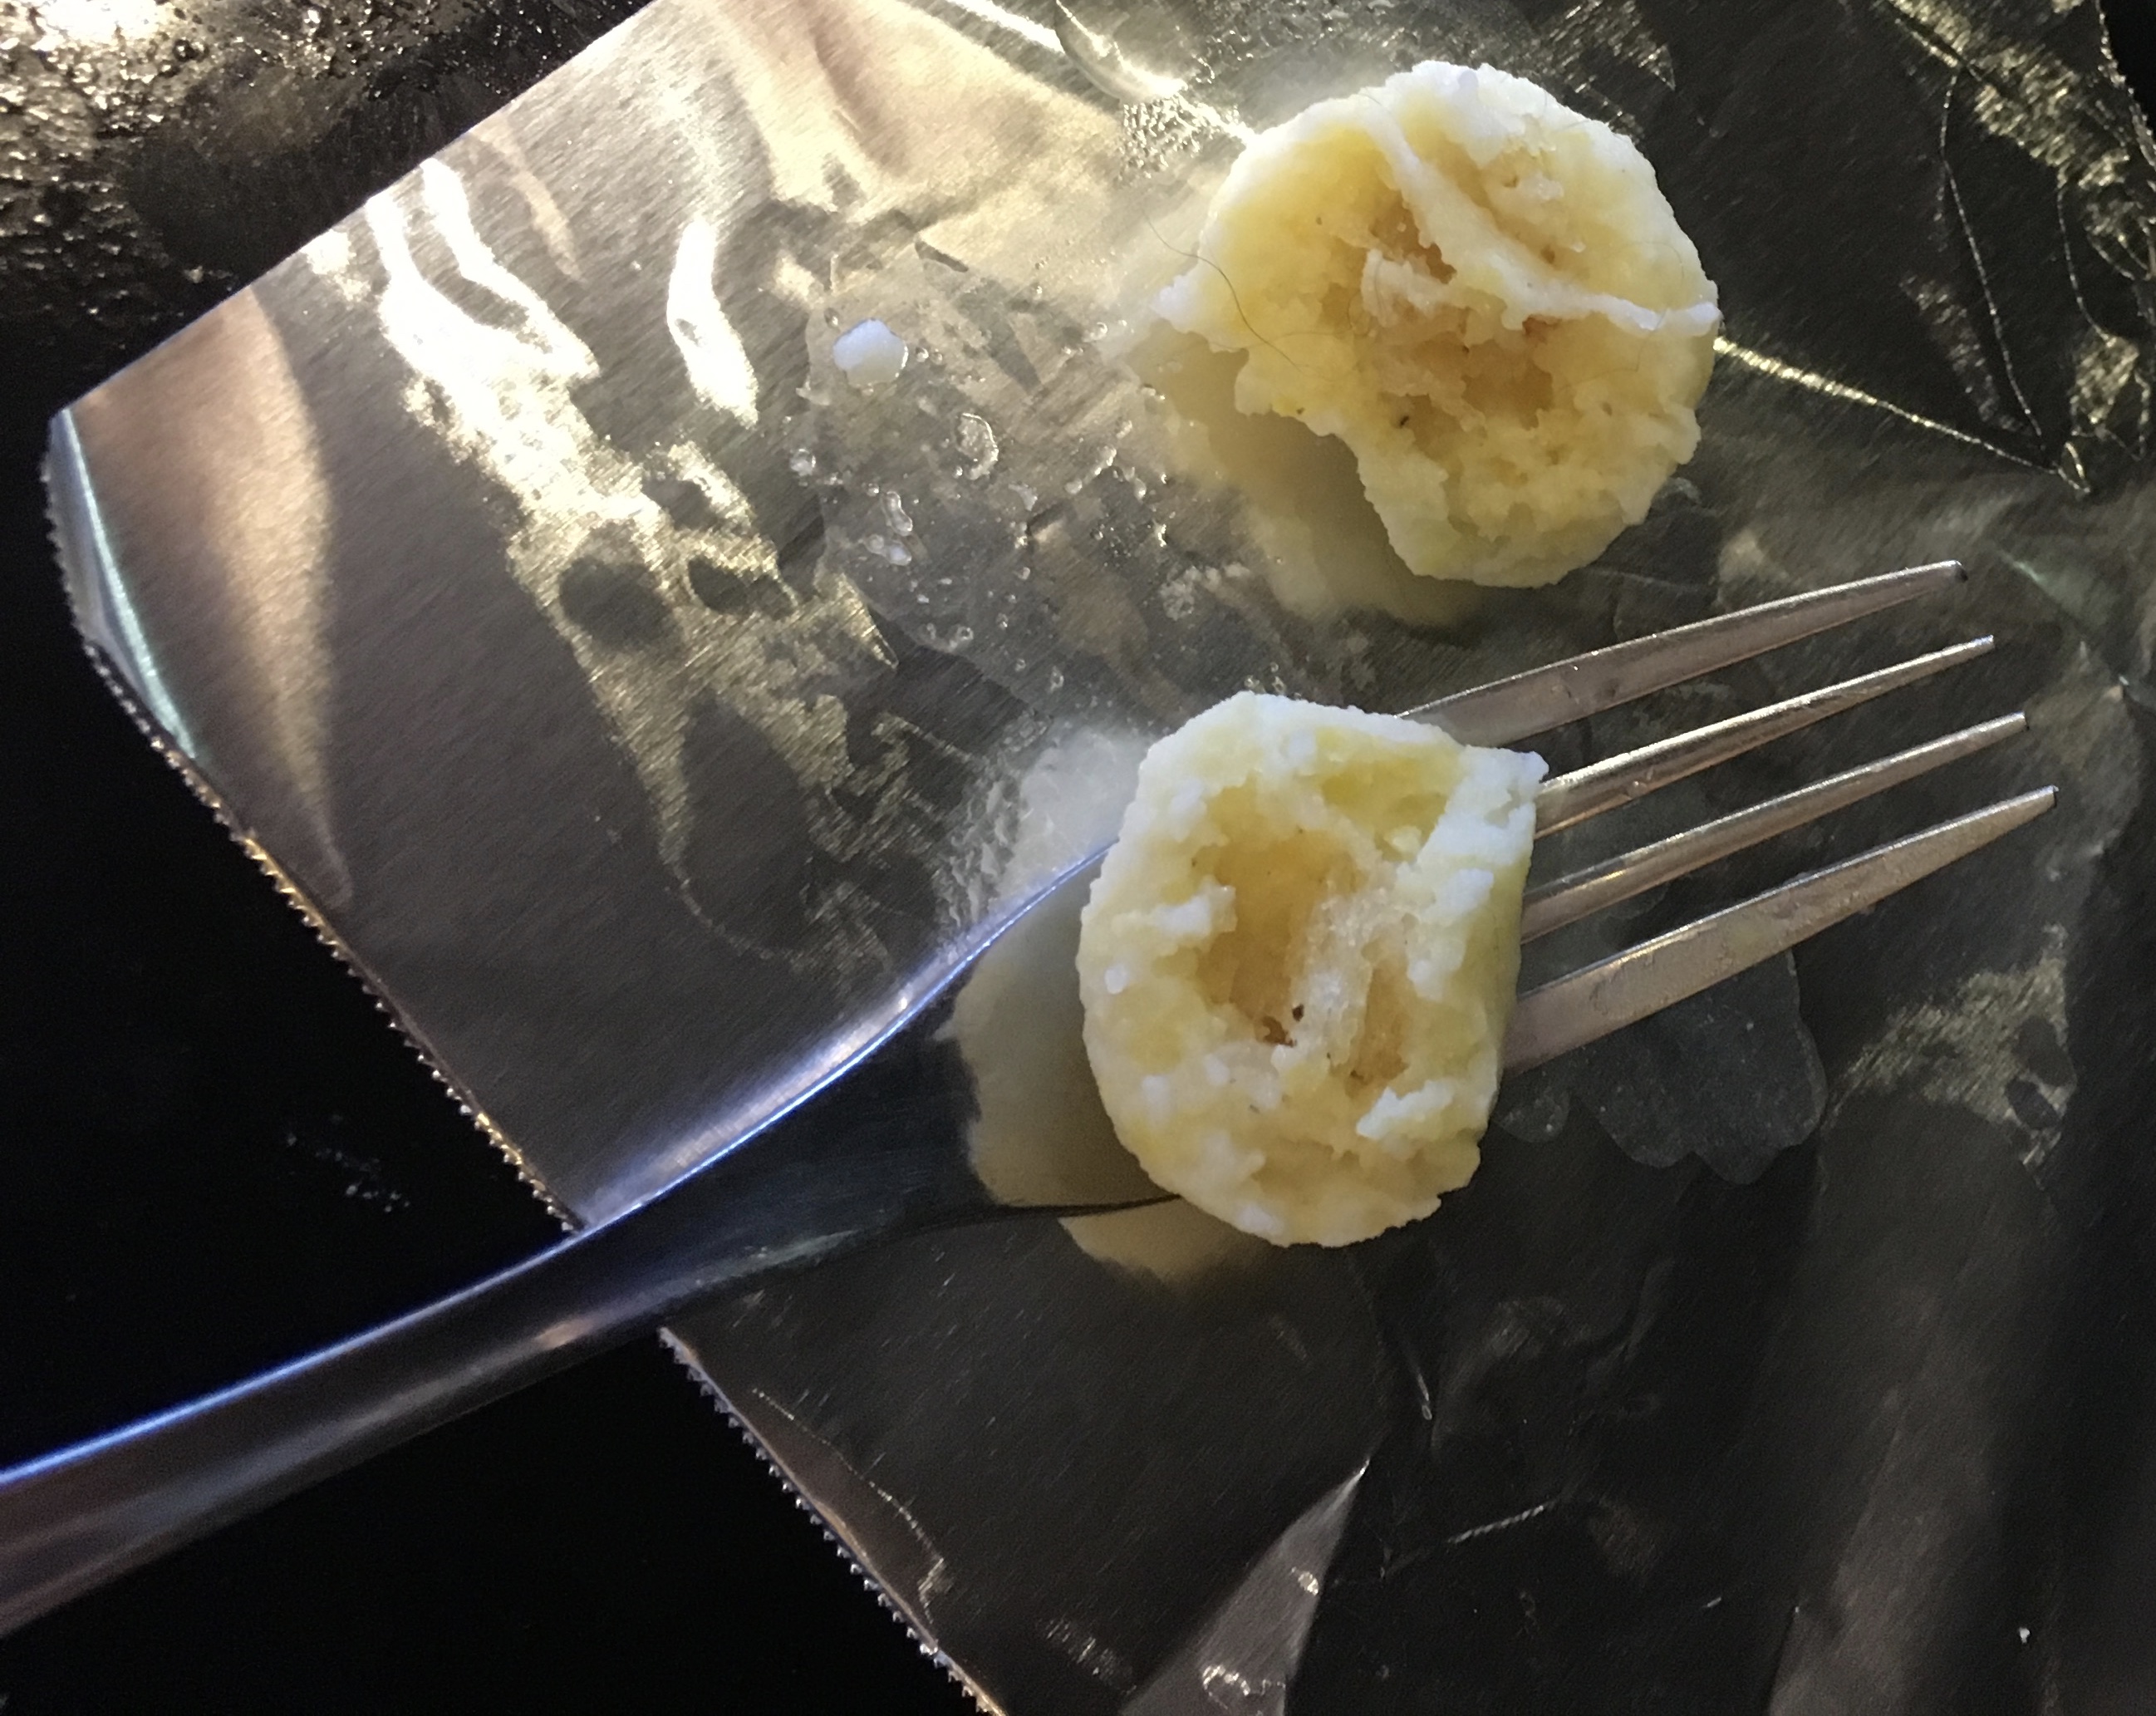
So then I rolled dumplings about meatball size inserting a small crouton in each.

I rolled the potato mixture into balls.

I boiled the balls 8-10 at a time for 12 minutes a batch.

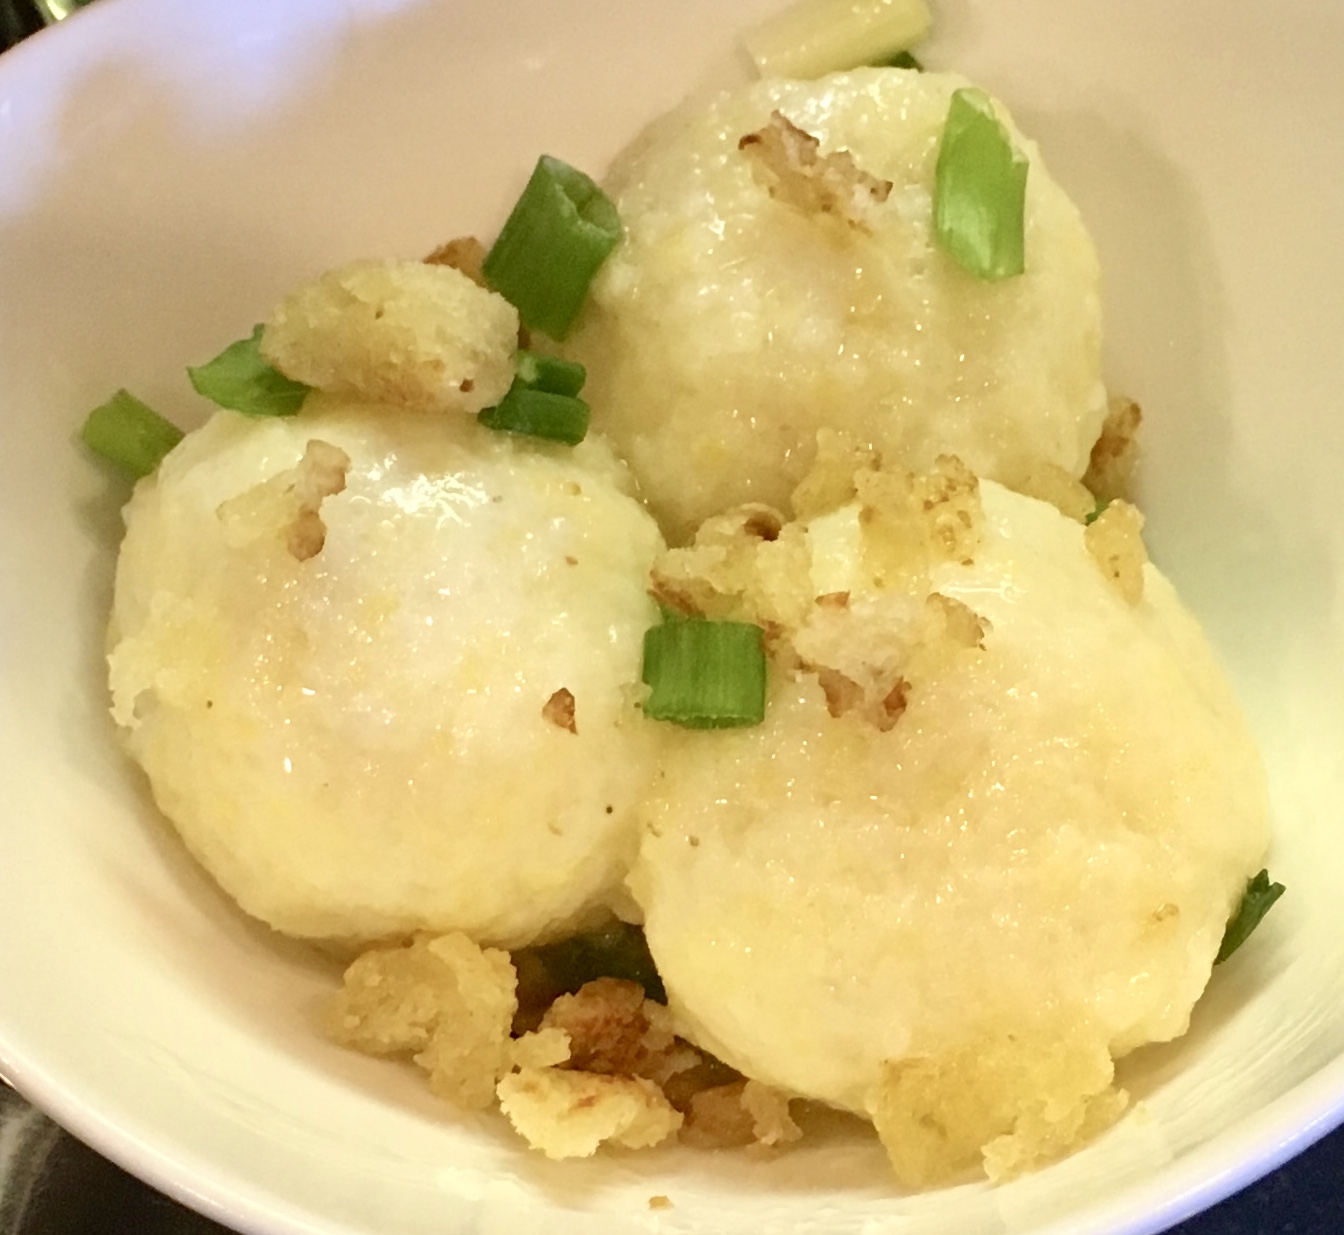
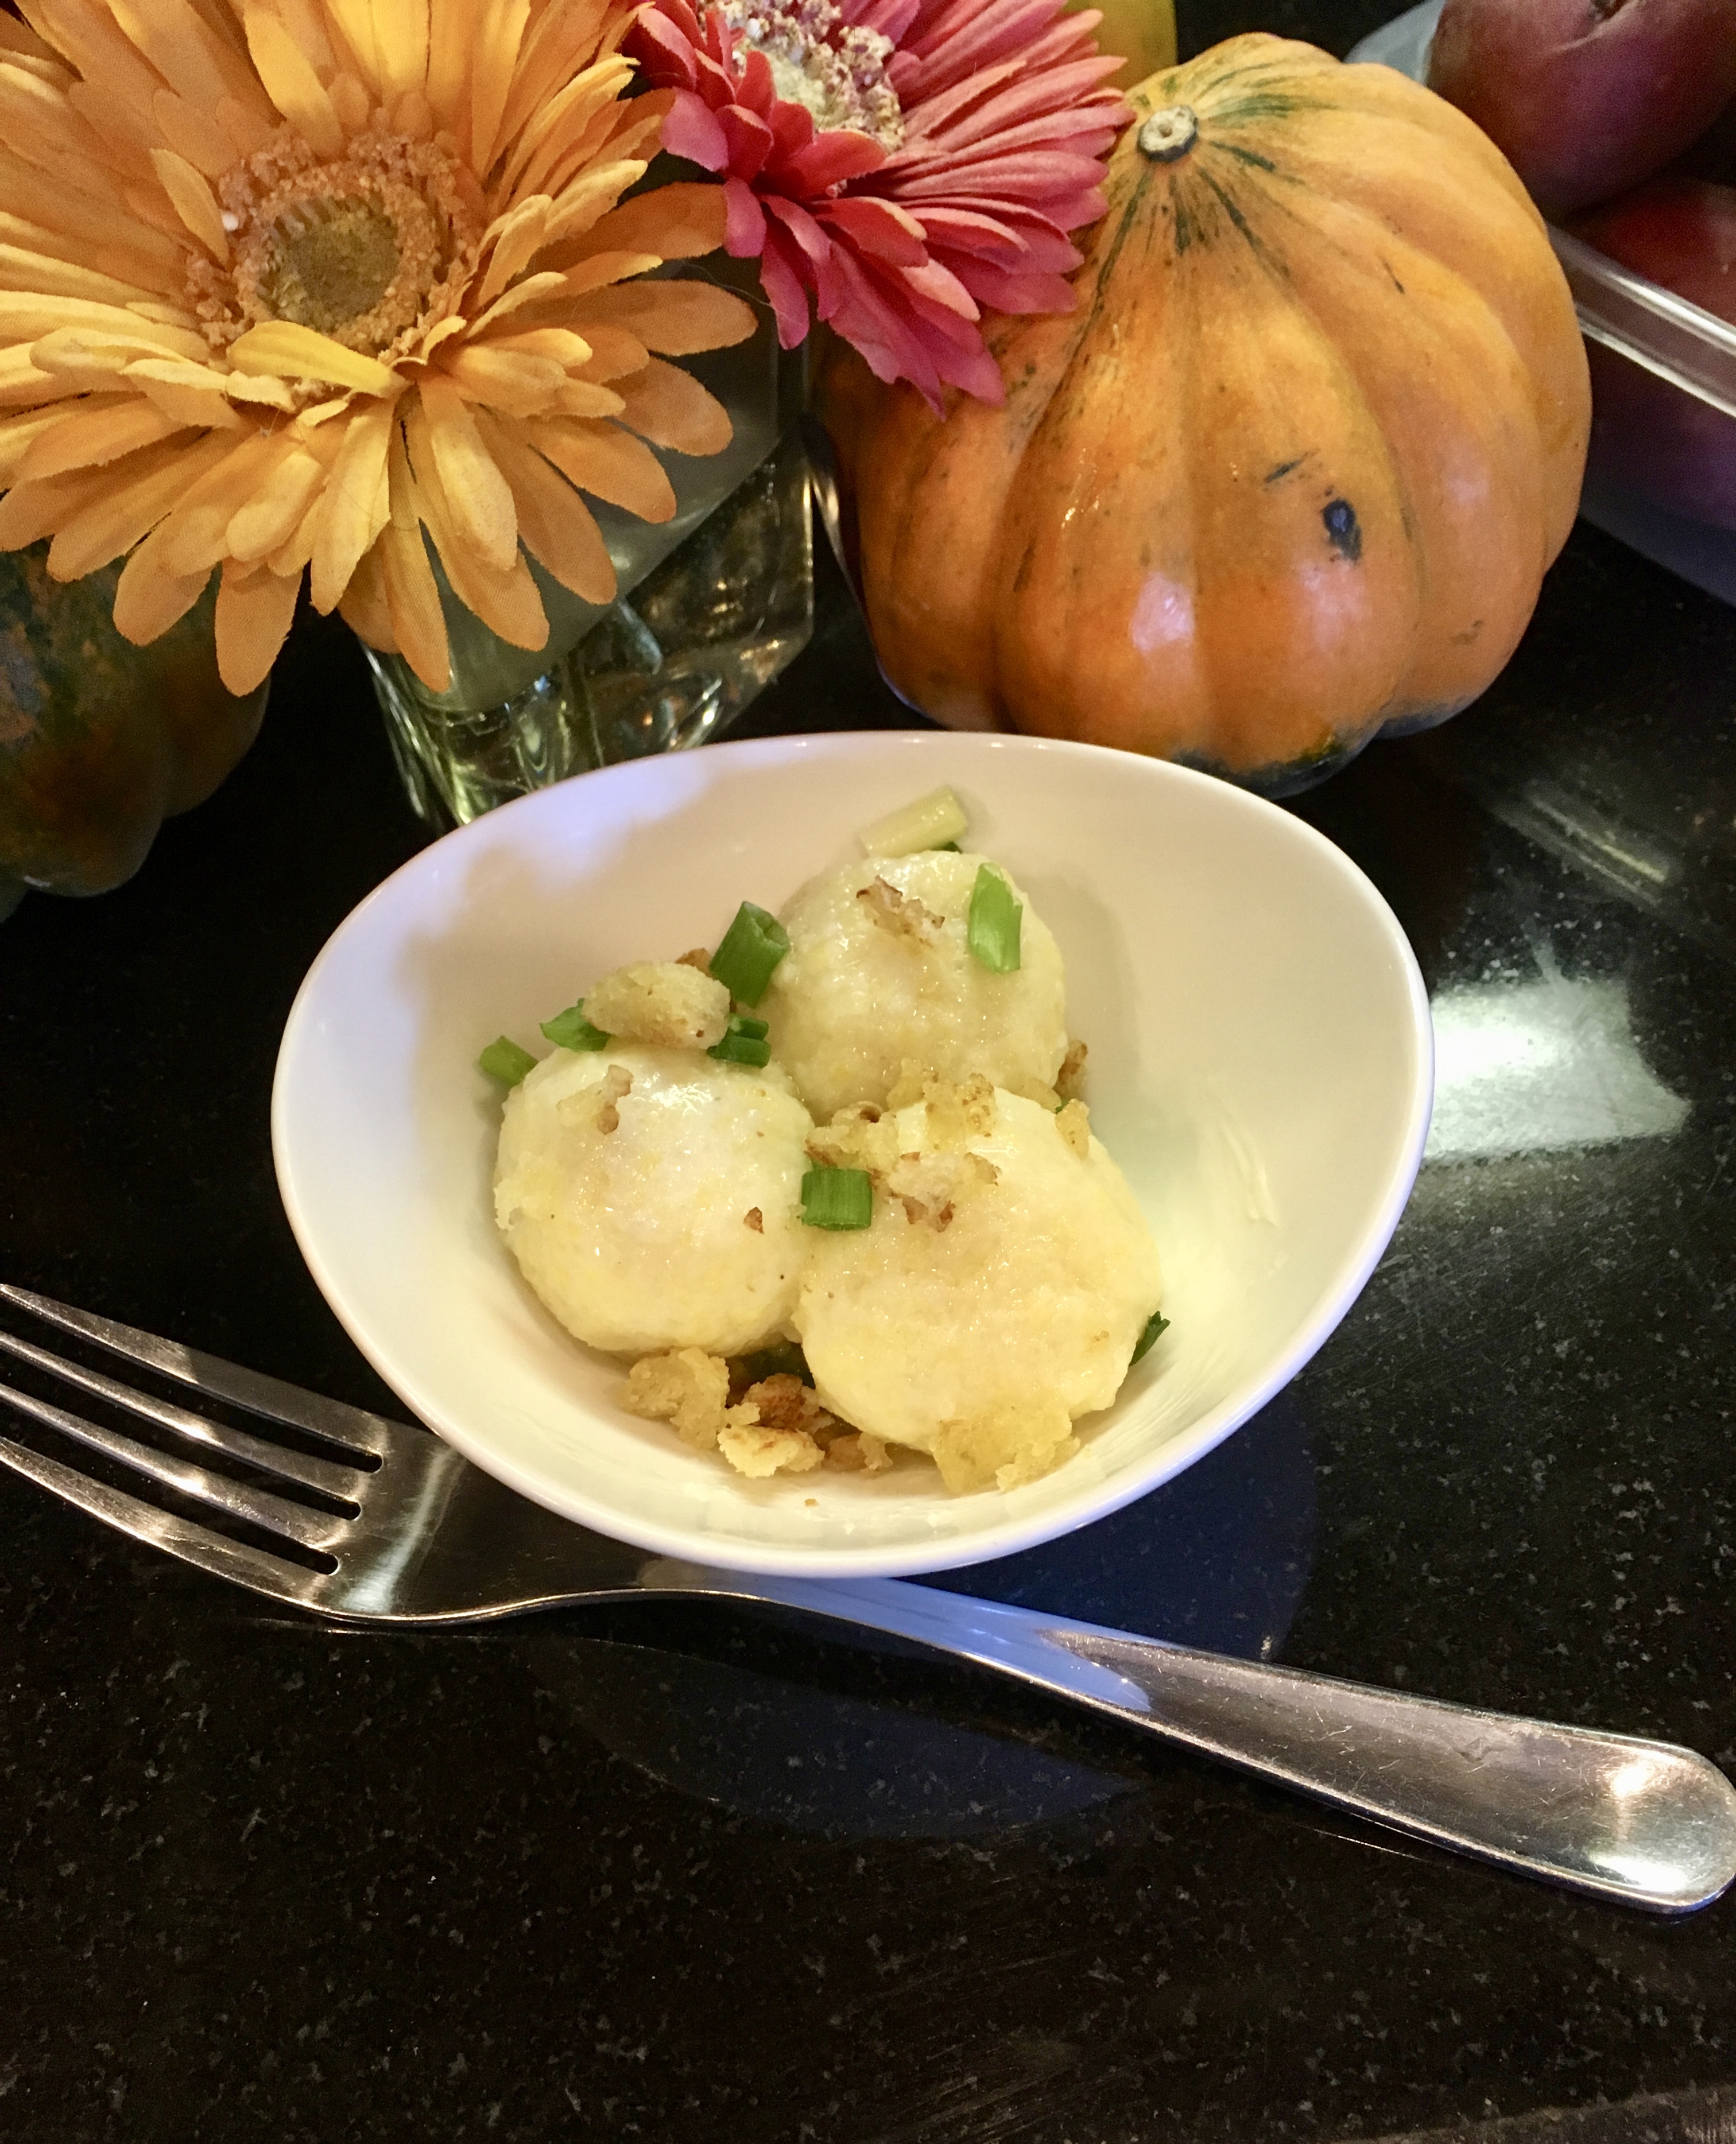
When I was a child my dad would serve these similar dumplings hot with just cold milk. I served then with unsweetened butter, sliced scallions and remaining toasted bread cubes broken down to crumbs.

Bavarian Inspired Potato Dumplings

These are delicious. These Dumplings came out very similar to what I remember and you might want to give them a try!

The Forking Truth


Forking Easy Delicious and Juicy Slow Roasting Chicken Recipe


White Meat

White Meat

I was watching Cook’s Country Cooking Show on PBS and they showed their method for slow roasting Chicken. They started the chicken pieces by putting a few drops of oil in a screaming hot pan and 5 minutes on each side. I think they only lightly salted and peppered the chicken. Then they put the chicken in a 250 degree F oven for 90 minutes on a cooling rack that is over a protected sheet pan…sort of like what I did below but they left a little more space around the chicken. They said on Cooks Country that it’s better to put the white meat pieces towards the inside of the oven and the legs on the outside of pan because the air is slightly hotter on the outside. My pan is crowded (I know my bad) but it’s such a good recipe the chicken still came out amazing.

img_6710

I skipped the fry pan step because I almost never eat chicken skin….

But sometimes I do brown the skin like in the photo below.

They said on the show you want the white meat to reach 160 degrees F

and they said on the show you want the dark meat to reach 175 degrees F

I found in 90 minutes my smaller pieces were at temperate and I removed them to rest.

The large legs needed another 15 minutes to reach 175 degrees F but as they rest I saw red juice filling up the skin so I put them back in the 250 degree oven for another 30 minutes and they were perfect. So to sum things up the smaller pieces of chicken needed about 90 minutes in a 250 degree F oven. The Larger Chicken Legs needed about 135 minutes in a 250 degree F oven.

fullsizeoutput_31ca

The skin all filled with juice and the juice went back into the meat. The whole house has a really good chicken aroma and I hear the pitter patter of furry feet.

IMG_0471

This one in photo above won’t leave my side.

during actual cooking of chicken this is how it was in my kitchen

“15 1/2 years old and I’m still handsome and alive despite all my doctor’s predictions……….He says….”.I’m getting lots of Forking chicken soon from my human because she’s a sucker for me.”

"I'm hungry....I'm getting me lots of Forking Moist Chicken Now!"

“I’m moving in closer…I’m getting me lots of Forking Moist Deeply Flavorful Chicken”

"I'm getting me some Forking Moist Chicken too!"

“I’m getting me some Forking Moist Flavorful Chicken too!” “But ..I will wait till I’m given some…unlike the pushy old man”

White Meat

White Meat

The meat is extremely moist and very flavorful with a deep really good chicken flavor. I really like this method for chicken on the bone. Especially for the deep chicken flavor and moistness for white meat. The skin is almost dry. I pulled it off and put it on a rack like this.

It took about 30 minutes in my oven at 350 degrees F. to get shattering crisp.

This was a very easy way to prepare flavorful Chicken that’s moist and juicy.

Thanks to Cook’s Country for a new (to me) alternative way to cook moist flavorful chicken.

 The Forking Truth

The Forking Truth


Not Too Sour Delicious Spaghetti Squash “Faux” Sauerkraut Recipe


Not Too Sour Delicious Spaghetti Squash “Faux” Sauerkraut

Pastrami Potato Plank Sliders with Not Too Sour Spaghetti Squash “Kraut”

I had a bunch of spaghetti squash that I cooked and thought that I could make a not too sour…. “faux” sauerkraut kind of condiment out of the spaghetti squash so I did and it came out delicious , flavorful and not too sour. If you are the kind of person that finds sauerkraut sometimes runs too sour for you then you will be a fan of this not as sour “faux” Sauerkraut.

Ingredients for about 4 servings

non stick canola spray (you can substitute a Tablespoon of oil if you prefer)

2 cups spaghetti squash – cooked – (pierce squash all over and throw in a covered pan with about a 1/2 in of water in a 350 degree F oven for about an hour or until you can pierce with a fork – seeds and seed membrane needs to be removed when cool enough to handle – scoop squash out of shell)

1/2 sweet onion – peeled and sliced very thin

1 garlic clove – ground to paste

1/2 cup apple cider vinegar

splash sherry vinegar

1 Tablespoon dark brown sugar

1/2 teaspoon sea salt

4 juniper berries – ground in spice grinder

1/2 teaspoon caraway seeds

1/4 teaspoon yellow mustard seeds

Directions

Spray a medium size fry pan with oil and place on medium high heat. Then add the onion and cook till translucent.

Add garlic, stir well.

Turn down heat to medium-low add squash and mix well.

Then add vinegars.

Then add remaining ingredients.

Mix well and remove from heat.

Serve.

Not Too Sour Delicious Spaghetti Squash “Faux” Sauerkraut

No fermentation. Forking easy and quick.. and Delicious!

The Forking Truth


The Food Lab’s Way of Crispy Roasted Potatoes Recipe


Crispy Roasted Potatoes

On the Huffington Post I saw a video of The Food Lab presenting “The Best Roasted Potatoes ever.” I remember The American Test Kitchen did potatoes in a similar way. I tried it and got a good but slightly different result. In both recipes the potatoes get parboiled with a small amount of baking soda that breaks down the surface of the potato to like mashed. When the mashed gets roasted a crispy coating forms. The recipe is pretty easy and straight forward. I think the crust will differ depending on how long you parboil. The potatoes come out with a really nice crust and are filled with creamy soft potatoes almost like mashed.

Ingredients for about 8 generous servings

3 lbs poatoes

1 oz salt

1/2 teaspoon baking soda

2 quarts water

5 Tablespoons extra virgin olive oil

3 garlic cloves – finely chopped

handful rosemary

salt

pepper

handful parsley

optional (my addition was just a tiny squirt of non-stick spray that I rubbed on very slightly because I don’t use non stick pans)

Directions

Get your pot with water, salt and baking soda. Add peeled potatoes cut in very large chunks and parboil till knife tender.

While potatoes are parboiling. heat up the olive oil with rosemary and garlic add some salt and pepper. Once heated drain…but save the herbs. (unless you use dry like I did…..then toss the used dried herbs)

Drain potatoes and let them steam and add the seasoned oil to them. Season the potatoes with some salt and pepper. Shake the potatoes around to gently bust up the surface of the potatoes.This makes your crust.


Set your oven to 450 degree F or 400 bake if you have a convection oven and place the potatoes on a pan leaving some space around each potato.

Put them in the oven for 20 minutes.

After 20 minutes turn each potato over and put them back in the oven.

Let the potatoes go for another 20 minutes and pull them out of the oven.

Decide if you want to go another 10 minutes or not.

Add fresh parsley and saved fresh herbs to the potatoes.

Enjoy.

The potatoes have a nice crisp coating and are moist and creamy inside. The potatoes are Forking Delicious!

Thanks to The Food Lab and The Huffington Post for presenting a video of this recipe.

Crispy Roasted Potatoes

The Forking Truth


Tuna Salad with Green Harissa and Toasted Spiced Garbanzo Beans Recipe


Tuna Salad with Green Harissa and Toasted Spiced Garbanzo Beans

I recently made Green Chile Harissa so I thought the flavors in it would be really great with tuna. I added some other ingredients and I became inspired to season garbanzo beans with Aleppo Pepper, Sumac, Sweet Paprika and Sesame Seeds. The combination is just Delish! I recommend a little sliced orange mixed into the salad…it just works really well.

Ingredients for 2 big entree servings

15.5 oz can 50% less sodium garbanzo beans – rinsed at least three times and drained (you really only need 1/2 the can but might as well toast and season the whole can because the leftover beans will be really delicious.

2 Tablespoons extra virgin olive oil

1/2 teaspoon Aleppo pepper

1/2 teaspoon sumac

1 Tablespoon sesame seeds

fresh ground sea salt to taste

fresh ground black pepper to taste

6.4 oz chunk light tuna in water

1 rib celery – chopped small

1/2 dill pickle – chopped small

1/2 cup green Harissa – ( my green chile harissa recipe is preferred but you can totally purchase a jarred variety of green harissa)

2 Tablespoons extra virgin olive oil

2 Tablespoons sherry vinegar

1/4 cup jumbo fancy mixed raisins (I like the ones from Trader Joes)

1 Tablespoon sugar

If desired fresh ground sea salt and pepper to taste

4 cups mixed greens – break the leaves down a little so you don’t put too big a piece of green in your mouth. Get out two salad bowls and put half the salad in each bowl.

1 orange – top each salad with half the orange in bite size pieces.

Directions

Set your oven to 350 degrees. Get out a baking pan and spread out the garbanzo beans in a single layer. Sprinkle them with the olive oil and add the Aleppo pepper, sumac, sesame seeds and salt and pepper to taste. Put in the oven for about 30 minutes. The beans should have a slight crispness to them and be creamy inside. Set to the side till ready to use. You will have some extra beans to use for another time.

In a medium bowl combine the tuna, celery, pickle, Green Harissa, 2 Tablespoons olive oil, vinegar, raisins and sugar. Mix well. Divide in half and put half on each salad.

Top each salad with a heaping 1/4 cup of the toasted seasoned garbanzo beans.

You might want to serve with oil and vinegar but I don’t think the salad needs it.

Tuna Salad with Green Harissa and Toasted Spiced Garbanzo Beans

My husband was afraid of this one when I described it to him but he was surprised that it was delicious to him. He was impressed and said it was really good and it was! Enjoy!

The Forking Truth


Green Chile Harissa Recipe


Green Chile Harissa

I had a bunch of Green Chiles I thought I’d make them into Green Chile Harissa. You might want to try the Green Chile Harissa on Eggs, Tuna, brushed on grilled meats, grilled vegetables or as a Tasty Healthy Sandwich Spread. The Green Chile Harrisa is easy to prepare and quick once you got all your chile roasted, peeled, de-seeded and de-stemmed. I note that my recipe uses the least amount of oil possible so you might care to add some extra oil for your taste. This sauce will also thicken slightly after a day.

Ingredients for about 8 servings

3 cups roasted green chile peppers. (I used about 25 but mine were on the smaller side) -peeled, seeds and stems removed and rough chopped

1/2 cup scallions – sliced up thin

2 garlic cloves – smashed

1/2 cup parsley – chopped

1/2 cup cilantro – chopped

2 Tablespoons cumin seeds

2 Tablespoons corriander seeds

1/4 cup lemon juice – fresh squeezed

1/2 cup extra virgin olive oil

1/4 teaspoon ground ginger

1 teaspoon sea salt

Directions

Combine cumin seeds and corriander seeds in a small microwaveable dish and microwave until fragrant. (about 30 seconds depending on dish and microwave) When the seeds cool down a little put them threw your spice grinder and then add to your blender. Add all the remaining ingredients to your blender and blend.

Something different and delicious that you can do with Green Chile Peppers.

Green Chile Harissa

The Forking Truth

Baked Popper Style Risotto Balls Recipe


Baked Popper Style Risotto Ball

If you make risotto then you know risotto doesn’t reheat so well and you might want to make some sort of risotto balls out of the leftover. I wanted to do something different so I thought of some sort of Italian inspired “Popper.” A “Popper” is usually a spicy pepper stuffed with cheese. I thought the perfect pepper to use would be those spicy and sweet cherry peppers. I added about a 1/2 slice of sharp provolone to each pepper, added an egg to my risotto and rolled them in seasoned whole wheat panko and they came out delicious! This one is a crowd pleaser I doubt you will have any leftovers after you make these. You can use this recipe with my Risotto with Black Truffle recipe (but you don’t need the truffles here) or another person’s recipe should work….but no guarantees.

Ingredients for about 8 servings

2 cups leftover risotto

1 XL egg

8 sweet/hot jared cherry peppers

4 slices sharp provolone cheese

1 cup whole wheat panko bread crumbs – unseasoned

1/2 teaspoon sea salt

1/4 teaspoon black pepper

1/8 teaspoon granulated garlic

1/4 teaspoon oregano

1/4 teaspoon basil

non stick spray

Directions

Preheat your oven to 350 degrees F.

Spray a baking sheet with nonstick spray.

Mix a slightly beaten egg into your risotto and put to the side.

Shake the liquid off the cherry peppers and stuff them with provolone cheese.

In a small bowl combine the crumbs and seasoning and set to the side.

Take about a quarter cup of risotto and encase the stuffed cherry pepper. You roll it in your hands like you are making a meatball. The mixture will be soft.

Repeat till you are out of stuffed peppers and risotto. If you can get more out this …do so.

Now start rolling the balls in the crumbs. I found it easiest to keep lifting the ball and dropping it in and roll it at the same time.

Put the balls on the oil sprayed pan in the oven for 20 minutes or until they seem cooked.

Let the balls cool a few minutes and serve with tomato sauce.

Baked Popper Risotto Ball

Everyone will Forking Love them!

The Forking Truth


Risotto with Black Truffle Recipe


Risotto with Black Truffle

I picked up a small fresh looking but American Black Truffle so I thought I’d cook up some risotto and see how it would taste.  This risotto is a well seasoned risotto but not over seasoned. It pretty easy to prepare risotto. It takes about twenty minutes of slowly adding ingredients and a lot of stirring. I normally don’t add cream or butter to my style of risotto but used them here because they pair well with truffles. Leftover risotto does not reheat well and you might want to make rice balls with whatever risotto that’s left. It turns out that the American Truffle was better than a canned or bottled truffle but not anywhere up there with Australian Truffles. I’ve read that Italian White Alba Truffles are considered to be the finest and most expensive. But I only remember tasting Australian Truffles from restaurants I’ve visited. Sorry for the poor photos. For whatever reason the risotto was next to impossible for me to capture with my iPhone and turned everything yellow without the colors that it had.

Ingredients for about 6 servings

3 cups mushroom stock (your stock should be hot for preparing risotto)

2 cups arborio rice

1 medium sized sweet onion – finely chopped

1 garlic clove – mashed to paste

1 Calabrian Chile – chopped fine – stem removed

2 oz. sweet butter – room temperature

1/4 cup extra virgin olive oil – maybe extra for serving

1 cup dry white wine

1 cup heavy cream

1 cup parmigiana reggiano

1/2 teaspoon dry thyme

1/4 teaspoon dry basil

1/4 teaspoon dry oregano

1/4 teaspoon dry rosemary

pinch saffron

a few grates fresh nutmeg

fresh ground black pepper to taste

pinch ground white pepper

at least .05 of a pound of fresh truffle

Directions

Get your sauce pot on medium high heat and add the butter, olive oil and, chile, onions, rice and stir until the onions are translucent.

Next add wine and stir until wine is absorbed.

Add a cup of stock and garlic and stir until stock is absorbed.

Add a cup or less of stock stirring till absorbed and continue till done with stock.

Add remaining herbs, spice, cheese and a cup of heavy cream.

It should look like this. Taste test and check that the rice is firm and cooked through. Add fresh ground sea salt and pepper to taste.

Serve immediately with shaved truffles. Garnish with a little extra olive oil if desired.

Risotto with Black Truffle

You will impress people with this one. It’s luxurious and delicious!

The Forking Truth


How to make the BEST Forking Cannoli in the Whole World Recipe


If you want to most delicious Cannoli you have to make your own fresh shells and fresh home made ricotta filling. The cannoli shells aren’t sold at local Phoenix Supermarkets and when you do find them at specialty stores they are very expensive..about $1.50-$2.00 a shell. Around Phoenix local supermarkets don’t sell fresh tasting ricotta cheese that taste good. The ricotta cheese sold here is full of gum and taste flat.  It’s some work but you have to make your own shells and cheese if you want a good tasting cannoli.  I’ve been making these for years and I got it down but I do spend three days  making these Cannoli but they can be done in two days. Three days before I need them I make the shells. I have a small fryer and can only fry six shells at a time so it takes a while. It might be a good idea to invest in a well made pastry mat for rolling the shells. I got a new one this year from a high end kitchen store and it made a big difference. My shells were easier to roll and came out much thinner ( as a result I also got about ten more shells from the same recipe. The next day I make the fresh cheese. The way I make cheese it comes out very firm and I flavor the cheese in three flavors, vanilla, chocolate and cinnamon. The minute I add sugar to sweeten the cheese it becomes too wet so I have to drain the vanilla and cinnamon flavors for a day. The chocolate stays very firm because the added cocoa dries it out. You will have extra cheese left over. You might want to remove up to three cups of ricotta and freeze use for something else like gnocchi, ravioli, toasted bread or rolled lasagnas. Fresh ricotta freezes very well. It will last 6 months to a year depending on your freezer.

Ingredients to make around 40 shells

2 cups flour – plus extra to roll out dough and dust dough

2 Tablespoons unsweetened butter – room temperature

2 Tablespoons sugar

2 pinch sea salt

1/4 cup water

1/4 cup wine (could be any wine lately I use dry white wine)

1 XL egg separated – both beaten (I use beaten yolk for sealing and white in dough batter)

vegetable oil to fill fryer

2 cups (about 2 cups) 10x sugar – to dust cannoli shells inside (to stay more crispy) and outside. (you have extra but I just toss that out.

optional – a few small pinches of anisette sugar on top of the dusted cannoli for extra flavor

1 gallon whole milk

1 quart heavy cream

2-3 lemons – just the fresh squeezed juice

1 1/2 teaspoons sea salt

sugar to your liking

natural vanilla extract to your liking

cinnamon to your liking

high quality cocoa powder to your liking

few drops of natural anise extract to your liking (a little goes a long way…don’t use much or skip)

Directions

Fill your fryer with oil and I set bring to 350 degrees F

In a medium bowl mix flour, butter, two pinches salt, water, wine, egg white, together with a fork. pinch a small ball the size of a smaller fresh cherry. Dust your rolling mat with flour and dust the dough ball. Roll from the inside out.

Wrap the dough around the cannoli core and seal with egg yolk. repeat at least 6 times. Use a tong and slowly place the dough wrapped cores into the hot oil. they will sink and then they will float. You will need to hold them down with the tongs or another basket so they can brown all over. They get down pretty fast and you remove them when they are golden brown and place on a towel or paper towel lined pan or baking sheet.

I’m not paid or anything to recommend Fanara’s cannoli cores but they really are the best. They are made from aluminum that cools quickly and they are designed so you can pinch the core and the shell comes off easily. The Forking Truth is that I threw out all my other cannoli cores and I tried Fanara’s. FT! (Forking Truth!) By the time you do six and then roll out your next six then the first six will be cool so you can slide the shells off the cores and get ready to repeat till done.

.

Place shells on new paper towels over a pan or baking sheet and when cool cover with plastic wrap.

To make the cheese you put a very large pot on medium heat and add the milk, cream and about 1 1/2 teaspoons sea salt. You have to slowly bring this to a rolling boil. It should take about one hour. During this time you stir it occasionally.

When the mixture is at a rolling boil then you SLOWLY add fresh squeezed lemon juice. Depending on the size and how juicy the lemon is you will need 2-3 lemons. You slowly add the juice and stop when you see it turns to curds.

Let it continue to cook for just a couple minutes and shut the heat off.

I use a metal mesh strainer and SLOWLY ladle out the mixture and let it drain and then add to a clean container.

Put in the refrigerator when the cheese cools down a bit. After a night in the refrigerator the cheese will seem very thick and it needs to be. Decide on what flavors you want to make. I like to make a third vanilla, one third cinnamon and the last third chocolate.  Add sugar and flavoring to your liking. A day before I need to use the cannoli filling I make the flavors because the vanilla flavor and the cinnamon flavor turn runny from the sugar and you will have to drain those fillings over night with paper towel lined colander that is kept in the refrigerator. (make it triple lined and line on top too)…you can drain the cheese for more than one day but change the towels at least once a day but twice is better.

The next step is the day of serving the cannoli I dust the inside and outside of cannoli shells with 10x sugar that keeps the inside crisp longer and adds another dimension of flavor to the cannoli. It’s easy to pipe the filling in with a pastry bag. You don’t even need to use a tip. You can add pistachios, chocolate chips or cherries to the ends but I prefer without.

Cannoli

I sprinkle a little cinnamon to the cinnamon cannoli and cocoa to the chocolate cannoli.

I made these cannoli for my neighbors and everyone said that these were the best cannoli they ever tasted.( FT)  This is the dessert my husband’s family requests for their annual Christmas Gathering.

These are the Best Forking Cannoli in the Whole World.

The Forking Truth


Basic Cheese Lasagna Recipe


Cheese Lasagna

Cheese Lasagna

Cheese Lasagna is easy to prepare. Like me you might not have a pasta machine to make  nice thin lasagna noodles but it’s easy and fairly quick to make your own ricotta cheese. The TASTE of home made ricotta makes a world of difference to this dish. I recommend making your own ricotta cheese especially if you live in areas that only sell very processed tasting ricotta cheese. So go for it. I make my tomato sauce free style in very large batches that I freeze so your going to have to use your favorite tomato sauce with this recipe. Leftovers freeze well. My photo just doesn’t do this lasagna justice. You can’t taste the fresh,  just right, light creamy cheese with great flavor that you won’t find at most restaurants. You can do no wrong when you make a lasagna that taste Forking Great like this one.

Ingredients for about 12 servings

1 gallon whole milk

1 pint heavy cream

3 lemons (just the fresh squeezed juice)

1 teaspoon kosher salt or sea salt

1/2 cup parmesan cheese – shredded

about eight grates fresh nutmeg

big pinch white pepper

1/4 + 1 pinch teaspoon dried oregano (the 1 pinch is used near the end)

1/2 teaspoon kosher salt or sea salt

1 XL egg

1 lb lasagna noodles

2 Tablespoons extra virgin olive oil

non stick spray

7 cups tomato sauce (maybe more)

1 cup Italian Blend cheese – shredded

Directions

In a large pot on medium heat add the milk, cream, 1 teaspoon of salt. Stir occasionally and bring to rolling boil this will take about an hour. During this time and latter you might have to slightly lower the heat to prevent a boil over. Once the pot is at a rolling boil very SLOWLY add the lemon juice till the mixture curdles. Let it stay on the heat just a few more minutes and then drain in a mesh colander. The mixture should be thick. Set to the side and wash out the pot and use to boil the lasagna noodles.

Boil the lasagna noodles two minutes less than the box suggest in salted water. When the lasagna noodles are done first drain them and then dump them in a bowl and sprinkle the olive oil on the noodles and shake the bowl around. The olive oil flavors the noodles and it also prevents them from sticking.

Go back to the cheese bowl it will be cooler now and add the parmesan cheese, nutmeg, white pepper, oregano, 1/2 teaspoon salt, and the egg. Mix Well.

Build the Lasagna.

In your non-stick sprayed pan you start with one cup of sauce and then start lying down the lasagna noodles. You top the noodles with a cup of sauce.

fullsizeoutput_30b1

Then you add half your cheese mixture. Top with some torn basil and another cup of sauce.

fullsizeoutput_30b2

Noodle it up again putting the noodles in the other direction.

fullsizeoutput_30b3

Top the noodles with another cup of sauce.

fullsizeoutput_30b4

Add the rest of the ricotta mixture. Top the ricotta mixture with another cup of sauce. Then top the sauce with fresh torn basil leaves and top that with a blend of Italian cheeses. Top this with a cup of sauce and Put the top layer of noodles on.

fullsizeoutput_30b5

Cover the pan tightly with non -stick spray (spray goes on the inside against the sauce so it doesn’t stick).

The pan goes in a 350 degree oven for 75 minutes.

After 75 minutes that the pan out of the oven, remove the foil,  and let it cool some on the counter.

Wrap it with plastic wrap and let in sit over night in the refrigerator to set.

Cut what you need for dinner and the extra can be frozen for latter use.

For reheating you might want to top the lasagna with a little more sauce. You might or might not want to add more Italian blend cheese.

I serve the lasagna with a little more sauce and serve with shredded hard Italian Cheese.

Cheese Lasagna

Cheese Lasagna

This is one Forking GREAT Lasagna!

 The Forking Truth

The Forking Truth